Saturday, January 5, 2019

Made! - McCall's 6941

For Robin's first Halloween I had the grand plans of making him a dragon costume and myself a Daenaerys get-up, but then the universe had a laugh at me thinking I had time for such things.


So, I made a work-appropriate Daenaerys-inspired midi skirt instead.


I used M6941 and not only blended sizes to make a skirt that fit, but completely redrafted the top 4 inches to fit my new post-baby shape.  I'm one of the [un]lucky ones dealing with Diastasis Recti, (fancy words for abs that didn't heal together properly after birth), which means I perpetually look about 16 weeks pregnant. It also means, that in the world of sewing and pattern shapes, my skirt fronts are now wider than my skirt backs, which is backwards to what I'm used to seeing.  I'm doing...alright...with the adjustment.  The hardest part is having the patience with not being able to do certain exercises that were my favorites and go-tos before pregnancy.


I added a lining to the skirt out of mystery material I found at Walmart. Isn't it great, though? It's a great color and great hand to support the other mystery material that forms the outside.  The color is a soft lavender blush - it's super feminine and not something I'd usually pick, but I actually really like it!


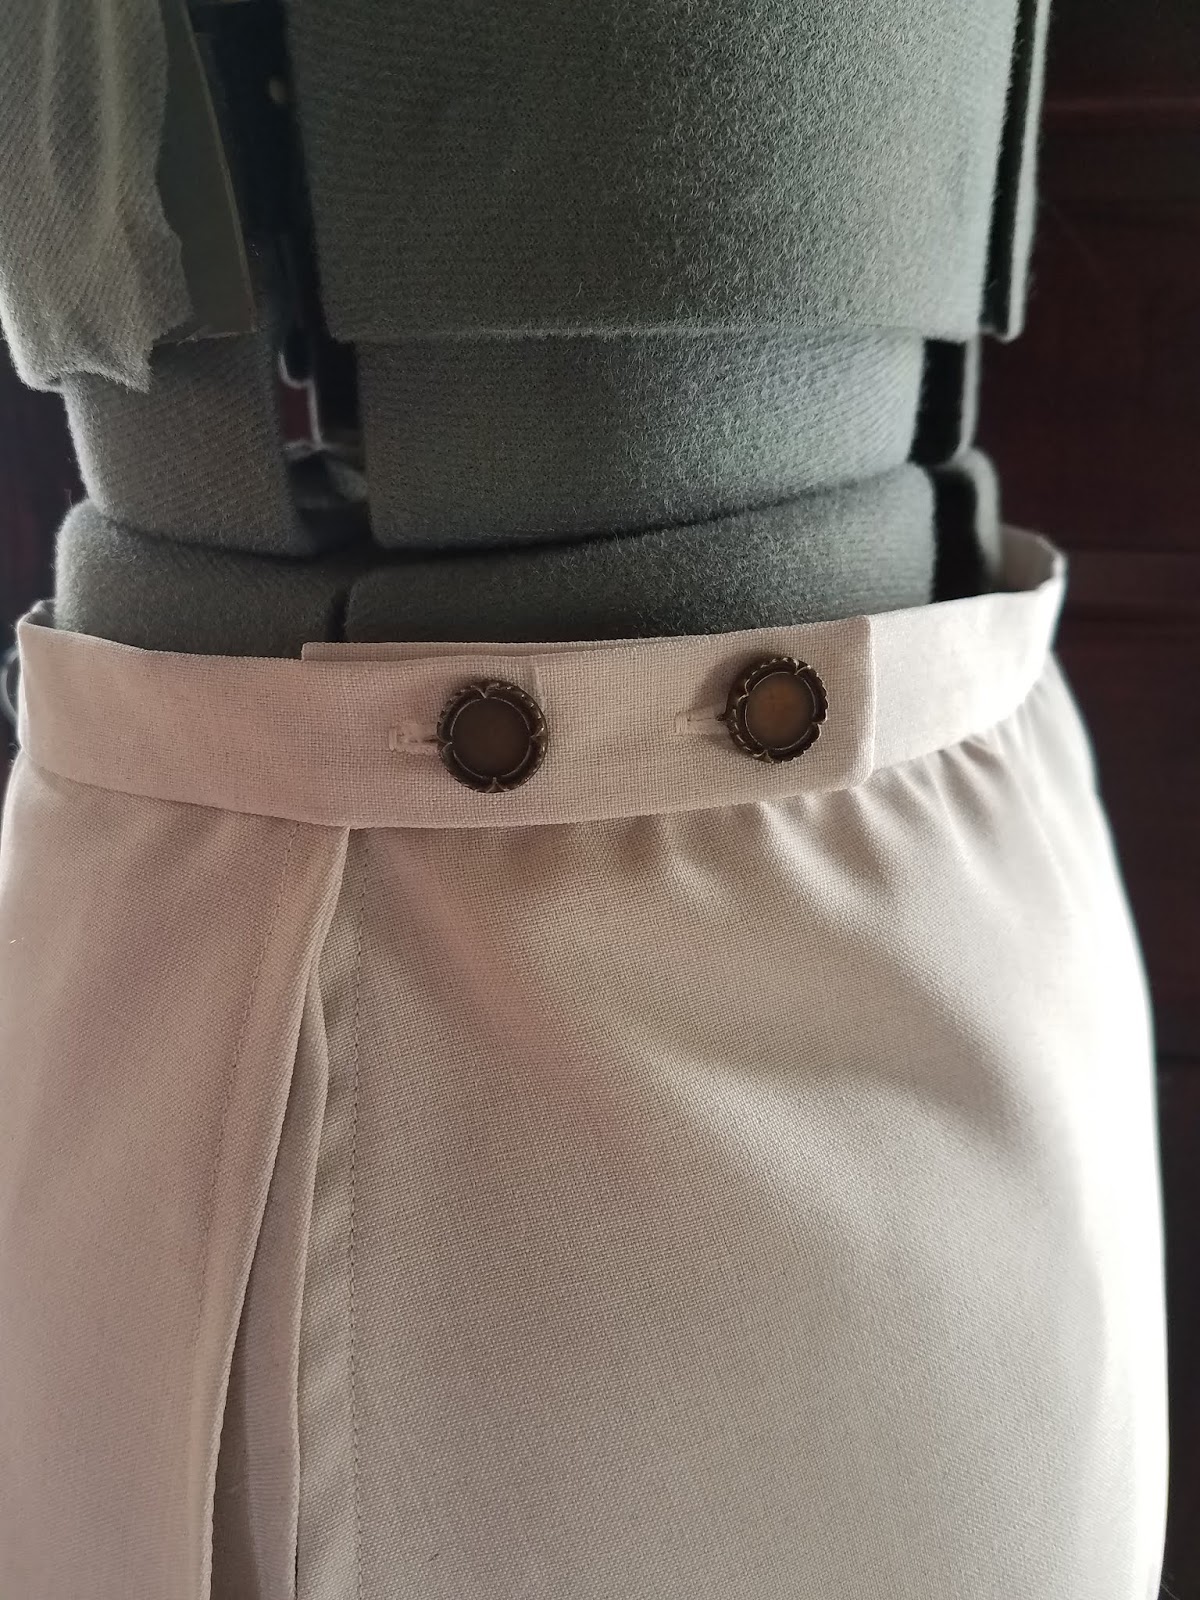
A mistake in construction led me to not include the overlay in the side zip, so it now floats on top rather than being part of the seam. It doesn't bother me. I extended the waistband in order to add some buttons, as you do when you love buttons.

The skirt back ended up a little gathered, but again, not a thing that bothers me. A little while ago it would have, but considering the other things I'm accepting these days (like always looking a little pregnant) it isn't a big deal.

This skirt went from being planned as part of a Halloween costume, then as a Christmas outfit, and when that didn't happen either it became a "Robin's First Birthday" skirt, and I'm happy to say that deadline I did meet! I finished it January 4 and he will turn one (OMGWHEREHASTHETIMEGONE) on January 14. 

Thursday, July 5, 2018

Made! - Simplicity 8085

As usually happens with family events, my cousin's wedding was an excuse to make myself a new dress!


I chose the material and pattern at the end of pregnancy as a first project for when my body shape began to turn back to normal.  We're still very much a work in progress in that regard, but I do really love this dress, especially with my turquoise belt.

The pattern is Simplicity 8085, a vintage reprint from the 1950s. 

Simplicity Pattern 8085 Misses' Vintage 1950s Wrap Dress in Two Lengths
I had to make many adjustments to the back in order to make it fit, most notably removing the darts and even more extra material.  Between my sway back and upright posture, I didn't need near as much fabric back there as the original drafted pattern.  I also raised the armholes, and then needed to tweak the bust darts.  I'm not totally satisfied with those, but it works!


The back of the dress is held in place with snaps! The pattern suggests adding some along the skirt's bound, wrapped edge, but I didn't have time to do that before the wedding. I'll add them before wearing this dress again, though, as a rogue breeze resulted in a surprise mooning for all those behind me! Good thing I, as well as my family, have quite a sense of humor. :)

Thursday, May 31, 2018

Made! - Simplicity 1069

Even if I wasn't dealing with extra poundage (still...guh) from little boy, I would have used my friend Amy's wedding as an excuse to make something. Duh.

It was a Boston reunion...of sorts! 

Since I find myself in the no-man's-land of body shapes and sizes - aka can't wear most of my usual clothes but refuse to buy any - I figure why not use the stash to fill in the gaps these days?  And, what's more adjustable than a wrap skirt? Simplicity 1069 was a perfect pattern.  It fits now, and it should fit later if-when I get back to my usual shape and size; all I'll have to do is move the waistband opening for the left tie.

Simplicity 1069, view D

The material is a Nicole Miller print from JoAnn, bought quite a while ago with a gift card from my sister.  I always planned on making a long skirt with it.  Even with buying extra I had to get creative with print placement so as it not have repeated panels. I ended up turning two of the pieces upside down, for print placement as well as fabric quantity.

All seams are French seams, and the waistband is slipstitched down on the inside.  The hem is a regular narrow hem.  I lengthened the pattern by an inch as I usually do, but I think I'll have to go 2" or 3" in the future with my more curvy curves.

I've worn this several times, and just love it.


These photos are on JMU campus after an afternoon of practicing. Little boy is rather tolerant of his parents needing to practice - he wears his protective headphones for a couple of hours and then gets to go on a nice walk outside. He loves being outside! Like his momma.

Love that boy.

Thursday, May 24, 2018

Quilt Photos - Finally!!

A year and a half after it was introduced in this post and gifted the following Christmas, I have finally captured pictures of the quilt I made for my sister and her husband.


The pattern is called Retro from Simply Retro, by Camille Roskelley.  I chose fabrics based on what I recalled as some of my sister's favorite colors, as well as the style of her mid-century home.  Between the two of us, she's much more likely to actually spend time outfitting her home, while being thrifty in the process. I wish I was more like that! I'm willing to put up with "cheap" until it falls apart - guess I haven't lost that whole living-like-a-grad-student thing...Anyway!

an accurate representation of the colors

I chose turquoise, white, brown, orange, cream, navy plaid, and a retro Kellogg print for this quilt.  The front is predominately turquoise and white, and the plaid is featured on the back, should she ever want to change it up.


I thought a pieced section on the back would add interest - no pattern for this part, just made it up with whatever I had left.


The front features a border edge, which isn't part of Camille's pattern.  I pieced two opposing corners, as I ran out of the Kellogg print.


I rather like the mushroom fabric featured in the contrast block!


It's hard to believe I finished this almost 2 years ago.  I remember sitting on the floor, battling to keep the cat off of it, frantically hand quilting before husband and I left to visit family for Christmas.  I worked on this baby for months!  I know some folks can get crazy with hand quilting, or are willing to pay someone to longarm quilt for them, but I'll probably always stick to my simple straight lines that match the pieces.  It keeps it a bit more meditative and less stressful!

As usual there's been quite a bit of making around here lately, just not lots of sharing about it. Hopefully I will get all caught up here on the blog soon!


Saturday, March 17, 2018

Made! - Butterick 6301

This jacket is the last of my maternity projects.  I started it in my last month of pregnancy and finished it in Robin's first weeks at home.  Things are settling down but the home uniform is still a bath robe, which is why you're getting only dress form photos. :) 

Butterick 6301 is a super practical jacket pattern with a center insert that transforms the jacket into a maternity or baby carrier option.  Though I never needed to purchase a maternity coat through pregnancy, I figured a coat that would allow me to zip Robin up while in his carrier would be really useful.

Image result for butterick 6301
The fabric is from my stash, bought many years ago on clearance.  


The lining is leftover from Christmas gifts a few years ago, and it makes me happy...all covered in kitties. :)


So, the only supplies I needed to purchase were the three separating zippers.  My local store didn't have three 26" in stock in an appropriate color, so I had to buy 28" zippers and instead lengthen the jacket.  (I figured I'd have to lengthen it anyway for my long torso, so this wasn't a big deal.)  The zippers are a warm gray, and I think it is a nice complement to the tan/slightly purple weave of the mystery clearance polyester/wool.  


The only stylistic alteration I made was to the collar: I shortened it by half its height.  I don't do well with turtlenecks or itchy collars, so a short one means I won't have to deal with that at all.  The front princess seams are topstitched, as is the lower half of the center back seam.  

The inside features a label (thanks, mom!) and joyful lining, much of which I handstitched.  


Now, onto the insert.  It's reversible, which is how you can get the two options out of it.  Figuring out the zipper direction for sewing was confusing until I decided to not look at the directions and instead to pin and zip it into the finished jacket - much clearer through tactile understanding over 2D pictures.  

Maternity-belly insert
 
Side View of maternity belly insert

Here's how I plan on wearing it this spring, with Robin in tow.


One day when we aren't all so tired and in comfy clothes all the time I'll add a picture of this jacket in action - with baby and all!!


Sunday, January 7, 2018

Made! - Maternity Wardrobe

There's not been an announcement here on the blog yet, but if you connect with me elsewhere via my music postings you are already well aware that my husband and I are expecting a little one to arrive early 2018.  To be exact: we are expecting him to arrive on FRIDAY. As in...5 days from now - January 12. 

What better way to put sewing skills to use than to make your own maternity clothes, especially when your only local options are Target and WalMart?  I've made my own pants (3 pairs), tops (2), and dresses (1).  I'll focus first on the Maternity Agnes dress, by Tilly & the Buttons.  I was so excited to stumble on this pattern!

Image result for maternity agnes dress

It's a comfortable black knit, midi-length dress, one that I've worn during many, many recitals.  It began pretty loose, with lots of extra material around the belly, but as little one grows, I find that isn't the case anymore!

LooCat, Christmas, Roomba, belly, and me on January 4

Seams are all serged, and hems are zigzagged on my regular machine. Sewing with knits is so easy. They're forgiving and the idea of fit is a bit more relaxed of a concept, since the material will help.

This version is a wearable muslin, and I've since made some changes, like taking out a bit of the back shoulder seam and moving the gathers of the front bodice down to accommodate my long waist - all are evident in the floral top below.

As *fun* as it is to make clothes for a new shape, I can't wait to be my normal self again.

Maternity Agnes and jeans from Burda 6607

Agnes can also be a top, and I've made one of those using some Nicole Miller fabric I found at JoAnn's. I really like the print, and cut it so the flowers are more concentrated on one side than the other.  This particular knit is VERY stretchy, so it easily covers my bump and long torso.

somewhere around week 37

Some of the garments I'm most proud of are my maternity pants, made using Burda 6607.  The wearable muslin is navy twill (not pictured), then more adjustments made for the jeans, and a couple more for the black stretch twill pants, which are great for work and concerts.  Despite my efforts to shrink the denim as much as possible, my jeans have lost almost an inch of length since completing them. Arg. Were it warm outside, I would cuff them up to wear with sandals, but considering it's been below freezing for almost a week...guh.

I cut size 14 according to my hip measurement (thank yoooooou inability to exercise properly), and did some grading based on assumptions on how I usually fit pants patterns, but still found that they are a little loose on me.  Just cause you're pregnant doesn't mean you want to be swimming in fabric all the time.

sometime late October

The jeans fit well, as I took width out of the back leg and side seams, and tightened the stretch panel at the top that goes over the belly.  Evidently I also have a rather flat pubis bone (yeah, I dunno), so I took out some extra fabric in the front crotch area by flattening the curve.

a good view of the fit and topstitching on my jeans, and how they fit differently from mid-2nd to late-3rd trimester

The black pants are the most fitted, but because they're made of stretch twill, they are very comfortable, something that is absolutely required these days! I wear them all the time.

January 6 stretchy pants for the 39w2d win

The last garment I have to share is a tunic made from Butterick 6226. I've had this fabric in the stash for the longest time, and had intentions to make a one-shoulder cocktail dress with it, but sometimes present circumstances thwart future sewing plans, yes?  I figured it would be nice to have something colorful amid a winter landscape. I get compliments on it every time I wear it!

I take back what I said...sometimes its fun to be swimming in fabric.

wearing wedding ring on a necklace because they don't fit on any of my current sausage fingers! :'(

I had plans to make so much more for this time in my life, but work and professional activities dwindled the sewing time. Until classes were over, that is.  Since then I've been hard at work making things for me (a postpartum tunic), husband (another bespoke dress shirt), and the little one...whenever he gets here.  At this point, it feels like he's going to stay in there forever!

Monday, September 25, 2017

Made! - Hack Vogue 8633 with maxi-length wrap skirt


Long wrap skirts have become a favorite garment.  You can make them to fit, but with some creative safety pinning you can change them to fit you at any point in life.  That's not the most glamorous point of view, considering I also enjoy the tailoring of men's shirts and couture hand-finishings, but sometimes a safety pin is all you need.  And we should admit that, mmm?


I made this dress for a family wedding.  The bodice, from Vogue 8633, is made of some upholstery fabric that I found and loved at my local fabric store.  The navy print I purchased in Utah while visiting my in-laws, and the coral satin underlay I bought locally on clearance.


Since the upholstery fabric is so thick, I didn't interface any of the bodice.  It stands up well on its own, and can be molded into different shapes at the neckline.  I prefer it curved down a little bit.


As part of my design, I chose to extend the back bodice around to the front and secure it with buttons on an angle, so that the bodice matches the wrap of the skirt.  This also kept me from worrying about a zipper.  It's lined, and the sleeves are bound in bias tape.


When attaching the skirt to the bodice, I used an inch allowance on the skirt so I could wrap the raw edges of the bodice.  Though it thickened the layers there a bit, I'd rather have that than scratchy edges.


Something I've contemplated is pinning up parts of the skirt to asymmetrically raise the hem, to make it friendly for warm weather.  The family wedding was outside, and this Tennessee September cooperated - it was actually a bit chilly! So, a maxi dress was just right for the temperature and breeze.


Anyway, this is my most recent make!  Not too difficult, not too easy.  Somewhere right between.