Showing posts with label buttons. Show all posts

Monday, September 25, 2017

Made! - Hack Vogue 8633 with maxi-length wrap skirt


Long wrap skirts have become a favorite garment.  You can make them to fit, but with some creative safety pinning you can change them to fit you at any point in life.  That's not the most glamorous point of view, considering I also enjoy the tailoring of men's shirts and couture hand-finishings, but sometimes a safety pin is all you need.  And we should admit that, mmm?


I made this dress for a family wedding.  The bodice, from Vogue 8633, is made of some upholstery fabric that I found and loved at my local fabric store.  The navy print I purchased in Utah while visiting my in-laws, and the coral satin underlay I bought locally on clearance.


Since the upholstery fabric is so thick, I didn't interface any of the bodice.  It stands up well on its own, and can be molded into different shapes at the neckline.  I prefer it curved down a little bit.


As part of my design, I chose to extend the back bodice around to the front and secure it with buttons on an angle, so that the bodice matches the wrap of the skirt.  This also kept me from worrying about a zipper.  It's lined, and the sleeves are bound in bias tape.


When attaching the skirt to the bodice, I used an inch allowance on the skirt so I could wrap the raw edges of the bodice.  Though it thickened the layers there a bit, I'd rather have that than scratchy edges.


Something I've contemplated is pinning up parts of the skirt to asymmetrically raise the hem, to make it friendly for warm weather.  The family wedding was outside, and this Tennessee September cooperated - it was actually a bit chilly! So, a maxi dress was just right for the temperature and breeze.


Anyway, this is my most recent make!  Not too difficult, not too easy.  Somewhere right between.

Tuesday, February 21, 2017

Made! - Vogue 1387, view B

As my first garment post-quilt, this was a really enjoyable project: Vogue 1387, a Rebecca Taylor design.
Image result for vogue 1387

Previously used for a gift for my mom (View A, blogged about here), I decided a long sleeve version for myself would be great for the season and work.


I LOVE THIS SHIRT.

The pattern is drafted beautifully. The front yokes and bias bands above the pleats are not altered to fit my shape - they just naturally fit.

Some Changes
- Graded to a size 6/8 around the waist for more shape
- Used a reverse pleat instead of gathers at the back yoke (next time I'll do gathers)
Welcome to our living room!
- Graded to a size 6 from the armscye to the wrist
- Overall, used size 10 in width, but size 12 in length
- Made my usual long torso adjustment, adding about an inch between the bust and waistline
- Used buttons rather than snaps because I LOVE BUTTONS


All seams are French seams, and the armscye allowances are whipstitched to the facings where possible, which will keep everything in place.

an inside view

one long French seam from wrist to hip
In addition to the fitting changes, I also constructed this shirt the way I like to make shirts for my husband - by attaching the sleeve at the armscye before sewing the underarm seam. Then, I sew the underarm and side seam together in one go.

The fabric is somewhat embarrassingly sourced at my local Walmart. As usual, I was there looking for something else but got distracted by the fabric section and found this mystery crepe for $2/yard.  For my next shirt I'll source from a local store.  This has become my process when trying a new pattern: cheaper wearable muslin and then locally sourced finer fabric.

An off-topic but happy accomplishment is a new ceiling light for our hallway. I installed it all by myself! It's a cool Tiffany design, and is a good transition piece from our bold living room (can you see that bright orange in the photos?!) to our neutral, tan hallway.


Friday, October 7, 2016

Made! - Vintage Simplicity 9332

It's probably safe to say that most folks don't interact much with their first grade teacher once they leave elementary school.  But we all know how social media has changed the ways we connect with one another, allowing us to keep too many tabs on others' life events, not to mention render the classic high school reunion all but useless.

But sometimes it's delightfully surprising what happens, like when my first grade teacher, Mrs. Worth, and I became friends on Facebook.  Truth be told, she has always reminded me of my mom, probably because they look alike.  I found out that she, too, enjoys sewing, and had many a pattern that needed a new home.

I am that home!


She was nice enough to drop them off with my parents, who delivered them to me on a recent visit.  There was a whole mix of styles in the box, many from the 70's, which - if you recall a different pattern collection gift from family - nicely compliment my collection from the 50's and 60's.  My aunt often mails patterns, too, which are usually 80's and 90's. So...costume designers, hit me up. Ha!

Anyway, one of the cute and practical patterns was for something called a scooter skirt.  It's basically a skort (skirt with shorts underneath).  An added detail is a tab with D-ring closure.  The pattern is drafted for a 24 inch waist, which I haven't had since middle school and needed to adjust to fit my current size. ;)

I used a pretty purple zipper because sometimes you have to rebel against matchy-matchy.


The fabric is a stretchy gray denim that I originally planned for another pair of Ginger shorts.  In hindsight, it's a bit too stretchy for this pattern, but it does make this make incredibly comfortable, even on a 10-hour drive! Ask me how I know...


I wore this out to a concert the day I finished it, and it was very comfortable! Husband and I went out for a drink afterwards, and rather than having to wiggle into a hightop chair in a short skirt I could just step right on up there, no worries! Yay, shorts! I must admit, as someone who moves a lot and isn't always the poster-child for graceful etiquette, these are good for me.

Rather than use D-rings for the tab I just tacked it down with a button that I've had for years. I love it!

See that LooCat tail in the background? She likes to help Momma sew...

I also tacked down the facing to the darts and seam allowances, making the inside very clean.

Thanks, Mrs. Worth, for sharing your patterns with me!

Thursday, September 29, 2016

Made! - Simplicity 8019

It has been quite a while since I've shared some makes on the blog, mostly because I've been super busy! That's not to say there hasn't been sewing, as there is always sewing. Here are some of the exciting reasons I've been preoccupied.

I'm now teaching at JMU! It's nice to be in the academic environment again working with college level students, even if academia does have its fair share of "opportunities" right now.

A new chamber music project, L+M Duo, has officially launched and completed a debut tour in east TN: UT, Carson-Newman University, and Lincoln Memorial University.  Our instrumentation is marimba and piano - and we both play each instrument, which makes for very interesting programming. Our next concert is in November in Chicago. Brrrrrrrrrr

We also got to visit with each of our families in August, which was a real treat. Love them all.

I also turned 30. :)

Now, back to the sewing...

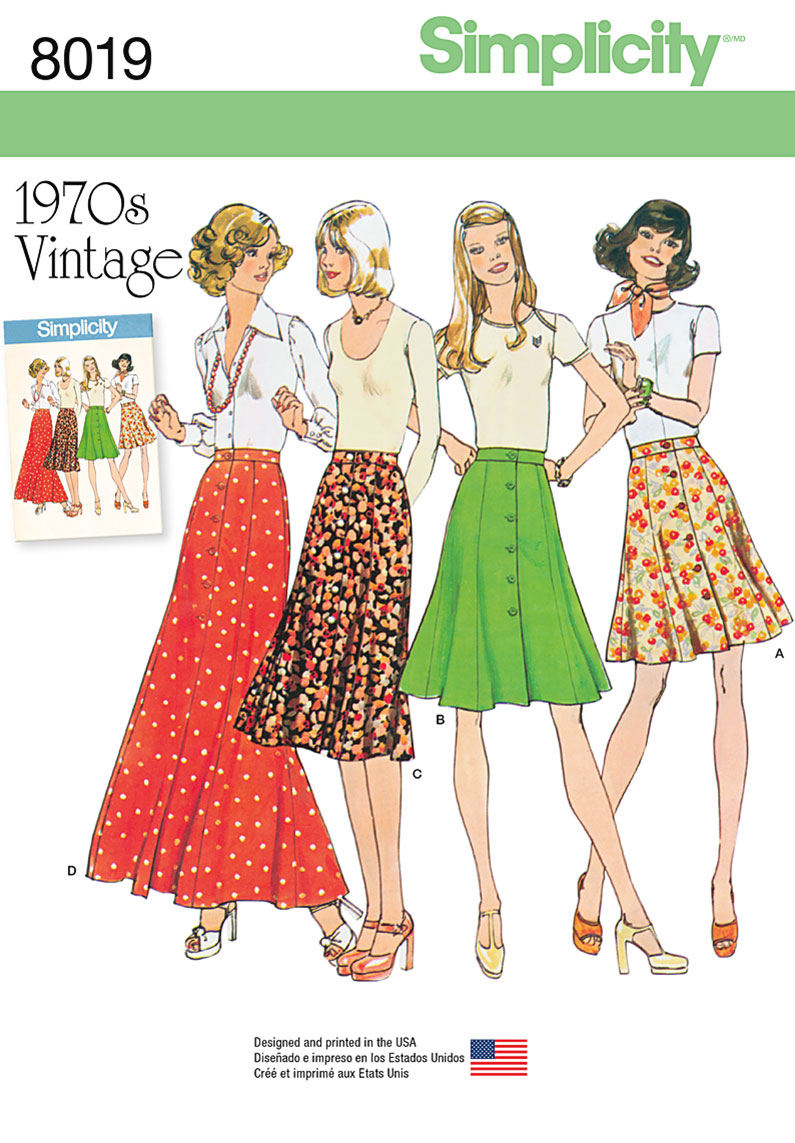
How I've gone this long without making a maxi skirt that included buttons is beyond me, as I love both of those things.


For this project, Simplicity 8019, a re-release from the 1970s, was perfect. It comes with four marked lengths.


The fabric is a black rayon challis bought at my local fabric store - woohoo, support local business!


I made it for a double family vacation in Florida, and it fared well.  I figured the humidity and a long skirt would be heavy, and while that was true, the tendency of every establishment to overdo the AC meant that I was actually quite comfortable.  This skirt is also a great one for flying, for the same reasons!

Slight alterations were made, from size grading to skirt lengthening.
Future changes:
  - add even more room around the front button band, as well as figure out how I want to tack it down
  - shape the waistband and use a bit heavier interfacing
  - lengthen the waistband to include a tab and button on the inside of the garment, as there's      otherwise slight pulling due to the horizontal button holes

Surprisingly, the pattern doesn't mention stay-stitching or any type of top-stitching for the button band.  Speaking of buttons...


The inside is done with all French seams, and the hem is a simple double hem, topstitched on the front.

The skirt works with a shirt tucked or untucked, which is great.  I'll probably be making more of these, as it was an easy project once the loooooooong pieces were all cut out.  You know how certain styles feel like that really suit different people? I've always loved long skirts.  I don't think they have to only be formal or dressy, though that's when we see them most often.  Nor do they have to be reserved for modesty only; in a fabric that moves, like rayon challis, they can be really flattering and attractive.  And, due to the  length, with the right styling they can be totally work appropriate.


Saturday, August 13, 2016

Made! - Ginger/Simplicity 1373 Shorts

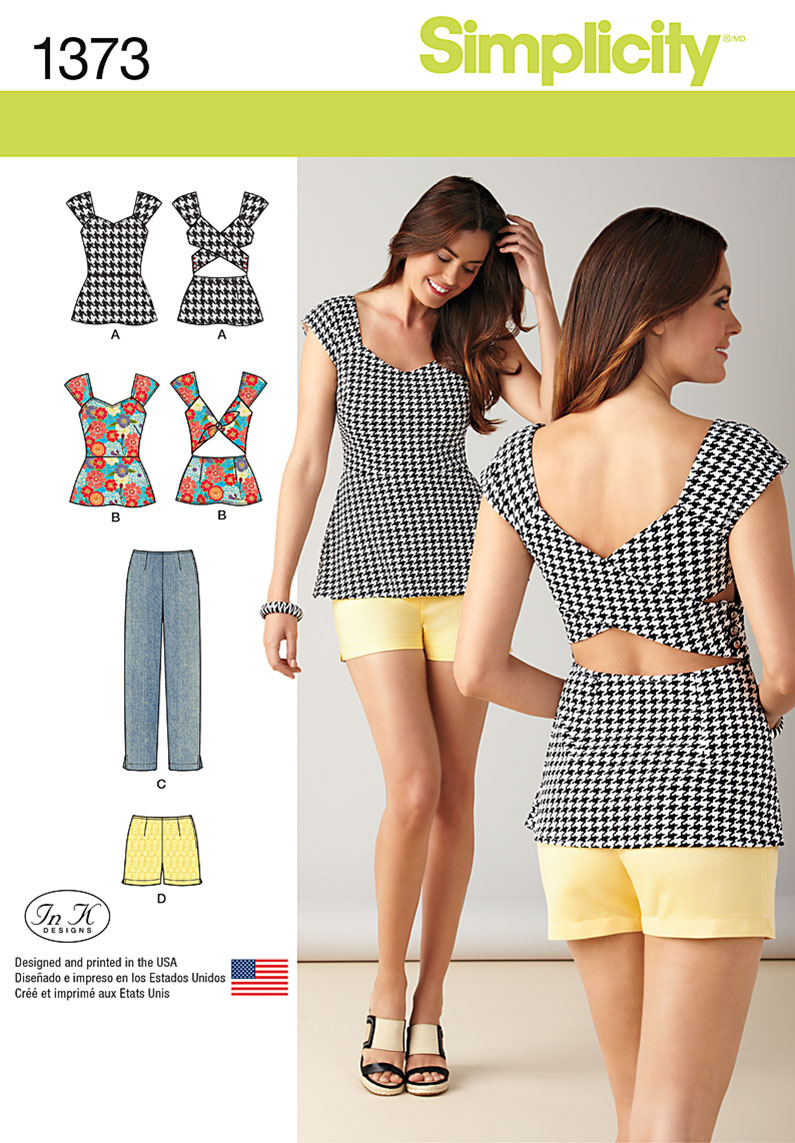
This is the second go-round of this pattern hack, and I made a few adjustments.  Not too many pictures, as there are only so many ways to examine simple black shorts. :)


Mostly, I wanted to increase the comfort level. We all know shorts that don't fit *just right* end up bothering you with wedgie occurrences every time you sit or stand up. I made some adjustments to fix that this time around; namely, increasing the crotch length, which sounds disgusting (and may end up with some weird blog traffic thanksGoogle) but essentially means I lengthened the curve that has to go around my body at the center seam.


I shortened the back yoke to fit my curvy swayback.


Otherwise, I kept my hack the same as the first time, following the Ginger instructions. Simplicity 1373 served only as a guide to the length and shape of the legs. I wound up not topstitching each seam, as I wanted these to pass as "nice" shorts rather than casual ones.  The fabric is a moderate stretch cotton sateen, which makes for a clean, finished look.


I installed a pocket stay, as these are high-waisted and I'd like as much help as possible in the flat tummy department.  (There are great pocket stay instructions on the Closet Case Files blog.)  I used cotton remnants in my stash for the pockets, so there's a glorious mismatch on the inside of the shorts. To me this represents my true self: might look fancy on the outside, but the inside is a little goofy, hahahaha

The button is one originally intended for a wool cape, but those plans got derailed a few years ago. That being said, I love it and it works really well on this garment!


I've worn these shorts many, many times - including flights and a day at Universal Studios - since finishing them, which means I've washed them several times, and am happy to report they still fit.  I always pre-wash and high-dry my fabrics to prevent future misfitting, but part of me still worries about it.  Luckily (or unluckily?) I'm the only person in my house that does laundry, so I don't have to worry about someone else's good intentions ruining one of my outfits. ;)


Wednesday, July 20, 2016

Made! - Self-drafted tulle skirt and Nettie bodysuit

Ya'll, it's been a year of weddings.  Husband and I have already attended 4, so naturally I had to make a new outfit for each.


Through the last few years of sewing I've figured out what silhouettes I like, what my style is.  But then there are moments like a few months ago when I decided that I needed to make a tulle skirt. Why? No idea. I spend my days in yoga pants, comfy dresses, and easy skirts - tulle is a little high maintenance. Add to it the fact that the tulle is mostly pink and it's like I don't know who I am anymore.

The inspiration came from the trim I used as the waistband.  It's a heavy linen with a beautiful embroidered design.  I decided that it should be the focus of the skirt.  The color of the tulle and bodysuit both come from the embroidery.


Layers (16!) of medium pink and apricot tulle are layered to achieve the color I wanted.  A quick gathered rectangle served as a lining.  Though I used the machine to attach the tulle to the waistband, the center back seam is sewn by hand with invisible thread.  Very time-consuming. Closure is achieved by snaps in the lining and buttons on the waistband.


Speaking of - check out those buttons! I've had them for years, waiting for the right project.


The Nettie bodysuit is made of some cashmere knit I found on sale at my local fabric shop. It is unbelievably soft and comfortable.  I learned that I need to shorten the armscye on this pattern considerably, as there was originally so much fabric that it bunched in a way that I couldn't just leave. So, after some creative pleating, I would up with this design, which not only shortens the armscye, but provides some interest and fits the style of the outfit.


Other changes I made to the pattern:
- lower the back neckline
- lengthen the sleeves by an inch

I think I'll make another post showing how I made the tulle skirt without a pattern, should anybody be interested! Part of me wants to make another one in black - what an interesting juxtaposition of a feminine fabric in a strong color!


Sunday, April 24, 2016

Made! - M6613

Ya'll, matching plaid is definitely not my favorite thing about sewing. Nonetheless, this garment turned out well! I looove the relaxed fit - I can play marimba and piano without it pulling!


I found this fabric - a lightweight flannel - on clearance at my local fabric store.  At the time our temps were still in the 40s, so...hence the lack of hesitation purchasing such a warm cloth.

The colors are beautiful! So saturated and bold - they look good with white, denim, black, and probably other colors that I happen to not own.  

Bias yoke!

I kept the length of my wearable muslin, blogged about here, but I added some width to the lower half of the front pieces to make room for my hips. 
In fact, many changes were made to the pattern after the first muslin was complete. 

- add 5/8" to sides at lower front, tapering to waist
- remove 2 1/4" of sleeve length
- remove 1/4" height from the collar stand
- remove 1/2" from each yoke shoulder, back armscye seam
- increase sleeve height
- raise each armhole 1/2"
- narrow the sleeve by 1/4"


Interestingly, I did not add length to the torso of this pattern. Perhaps that's because it's so gender-neutral? Not sure.  

At the suggestion of a recent article in Sew News - thanks, Nana, for the subscription :) -  all collar and collar stand pieces are interfaced for crisp lines, as opposed to just one of each.  Since the collar buttons were going to be omitted for this shirt, a crisp collar was an absolute must.


Crisp collar and matching pocket greatness.


All inside edges are finished as French seams simply because I'm in the habit of doing them. Next time I make a shirt for myself I'll use bound seams, though. 

Button color was a hard choice for this shirt. I couldn't decide between white, tan, blue, or navy, but it's obvious where things settled in that regard, I suppose.


I really like this shirt styled with white jeans or capris.  It helps it fit into the colorful seasons ahead. (Though summer is my favorite season and I'm really looking forward to it, I'm excited to wear this shirt with some jeans and cute brown boots in the fall!) 


Next project: a Mother's Day present for momma!!

Monday, April 11, 2016

Made! - M6613

After spending many hours creating a custom fit shirt sloper for my husband, I thought it was about time to make one for myself! So, when I came across M6613 during one of JoAnn's stellar pattern sales, I decided to snatch it up as a base shape.


I knew there would be lots of ease, since it's somewhat of a unisex pattern. (The line drawings make it look like there will be separate pieces for men and women, but that's a bag of lies...you have to do all of that in the fitting yourself.)

What I'm wearing here is my muslin, with no changes. I figured it's best to see what I'm working with before hacking it to pieces, no?  Seems I've got my work cut out for me! I wore it to work today with my Easter skirt.


For work I styled it differently, but here she is.
I got lots of compliments on my outfit, so I guess it looks alright!


As expected, there's a lot of room in the back, but I think I like that. My typical beef with button-ups is that there's not enough ease for me to actually move my arms. For my next version, I'll take some width out of the back beneath the yoke, so there's a slimmer silhouette but still wiggle room.

It's nice that the armscye is generous, but I think I will raise it a tad.  There's an opportunity for some work with the bust as well, but I'll talk more about changes when I make the shirt out of its intended fabric!

cat butt. she's not sorry.
I love this chambray so much that I decided no matter how it fits I'd make it right, complete with edgestitching and finished seams.

Inverted pleat for ease
The piece consists of two pieces, which are supposed to meet the yoke seam. Oops.


This shirt is nice and long, and I like it styled down, untucked. You'll notice that I'm short on buttons. I have so many that I refused to buy more for what began as just a muslin. So, I used four that were lying around and will purchase additional ones later.


I'll leave you with a picture with LooCat, who did not want to be photographed.

"Noooooo, Momma pleeeeeease....."
I'll catalog all my changes to the base pattern once I get working on the next shirt! It's exciting to think I'll have a sloper that fits me perfectly! Yay!

Saturday, August 1, 2015

Made! - Ginger/Simplicity 1373 frankenpattern

Wow - my last post was almost two months ago.  This is pretty representative of the sewing activity lately, considering the move and all.  There's been lots of unpacking, painting, organizing, cleaning...but not too much sewing.

Husband and I returned from an amazing performance trip in Costa Rica last Saturday, and I joyfully spent a marathon day in the sewing room making these babies.

Our new backyard! Also, COFFEE!


They're a hack between Closet Case Files' Ginger Jeans pattern and Simplicity 1373.  I know, they're pretty much your basic high-waisted shorts.  My body's 'Laurel-you-should-have-been-exercising-instead-of-painting' cushy bits have settled, leaving me less excited than usual about it being the warm short-bearing season of summer.  [le sigh]


Essentially, I used Ginger from the waistband to the bottom of the front fly, and from there used the leg shape and cut from Simplicity 1373.  I used the end of the crotch curve as my spot to hack the patterns, making for a rather seamless frankenpattern, if I can say so myself.  The only other change was to omit the topstitching on the waistband; instead, I stitched in the ditch on the outside, catching the waistband facing in the process.  

The fabric I used is a cotton twill, which worked really well for these shorts, as it's sturdy without being restrictive.  The print is a bit crazy, and only after cutting into it did I realize that I needed to dodge giant circular bursts on buttcheeks and oval bullseyes on...other places.  It was a print placement nightmare, and I don't love how they ended up, but I can deal with it.

And speaking of cutting, I cut the Ginger at a size 6 waistband, size 10 everywhere else, connecting to a size 12 Simplicity 1373.  Such is life.

Back view. CRAZY PRINT. Should have thought a little harder about placement. Oh well.

A crazy back pocket on crazy back legs. 

I used lightweight interfacing for the waistband, pockets, and fly front, which provides enough support without creating tons of bulk.

Kitty in the corner.

I included a pocket stay to help prevent food-baby tummy embarrassment.  I used a leftover thin cotton to line the pockets, since the pocket stay is out of the same twill as the garment, to keep from creating front pockets that were backed by almost a quarter inch of fabric.


I will say this: I love the length of these shorts.  They're not too long or too short. YES! I added an inch to the inseam of Simplicity 1373 before cutting, and that left me with a 4.25" inseam after hemming the legs. You know how when you sit in shorts and the top part of your thigh shows and it makes you self-conscious? (I know you know...) These are just long enough to cover that part of my leg while sitting, making this Laurel very happy.

I sewed in a pretty pink label.


And used a pretty button made in Poland for the front.


Husband helped me take pictures after breakfast.  Leeloo cat helped, too.


The work going into settling the home is resulting in the desire to sew easy patterns in easy fabrics, so I anticipate most of my next projects will be cotton or some other non-slippery fabric.  We're talking 3-piece dresses and simple skirts...somewhat of a change from my usual fare. 

Looking forward to it :)